

Davinci Resolves Podcast Editing
Text-Based Rough Cutting and Other Time Savers

Introduction
A while back a friend persuaded me to shift from Kdenline to Davinci Resolve for video editing. I’m very pleased he did.
Resolve is the tool of choice for Hollywood films and has the steep learning curve one might expect from professional software. It has a vast array of features I find incredibly useful but the number one attraction is the time it saves me. Simply by switching from Kdenlive I’ve saved myself many hours of boring, repetitive work.
Use Case
Here’s the use case: each Sunday I host my weekly podcast SimonTV LIVE for two hours. Several thousand people tune in to watch the live show but tens of thousands more watch the highlight clips I release daily until the next live episode. I need to select seven clips from the recording of the two hour-long podcast, add a credit sequence, subtitles, fades and a bit of polish. Nothing too complicated, simple edits that are time consuming and repetitive.
The workflow in Kdenlive was laborious, I’d scrub through the recording -essentially watching a repeat of almost the entire show- then process each selected clip individually. This process could consume as much as five or even six hours of my time.
Thanks to Davinci Resolve I can now do it in one hour if I’m in a hurry and comfortably in 90 minutes. How, is almost entirely depicted in this screenshot:
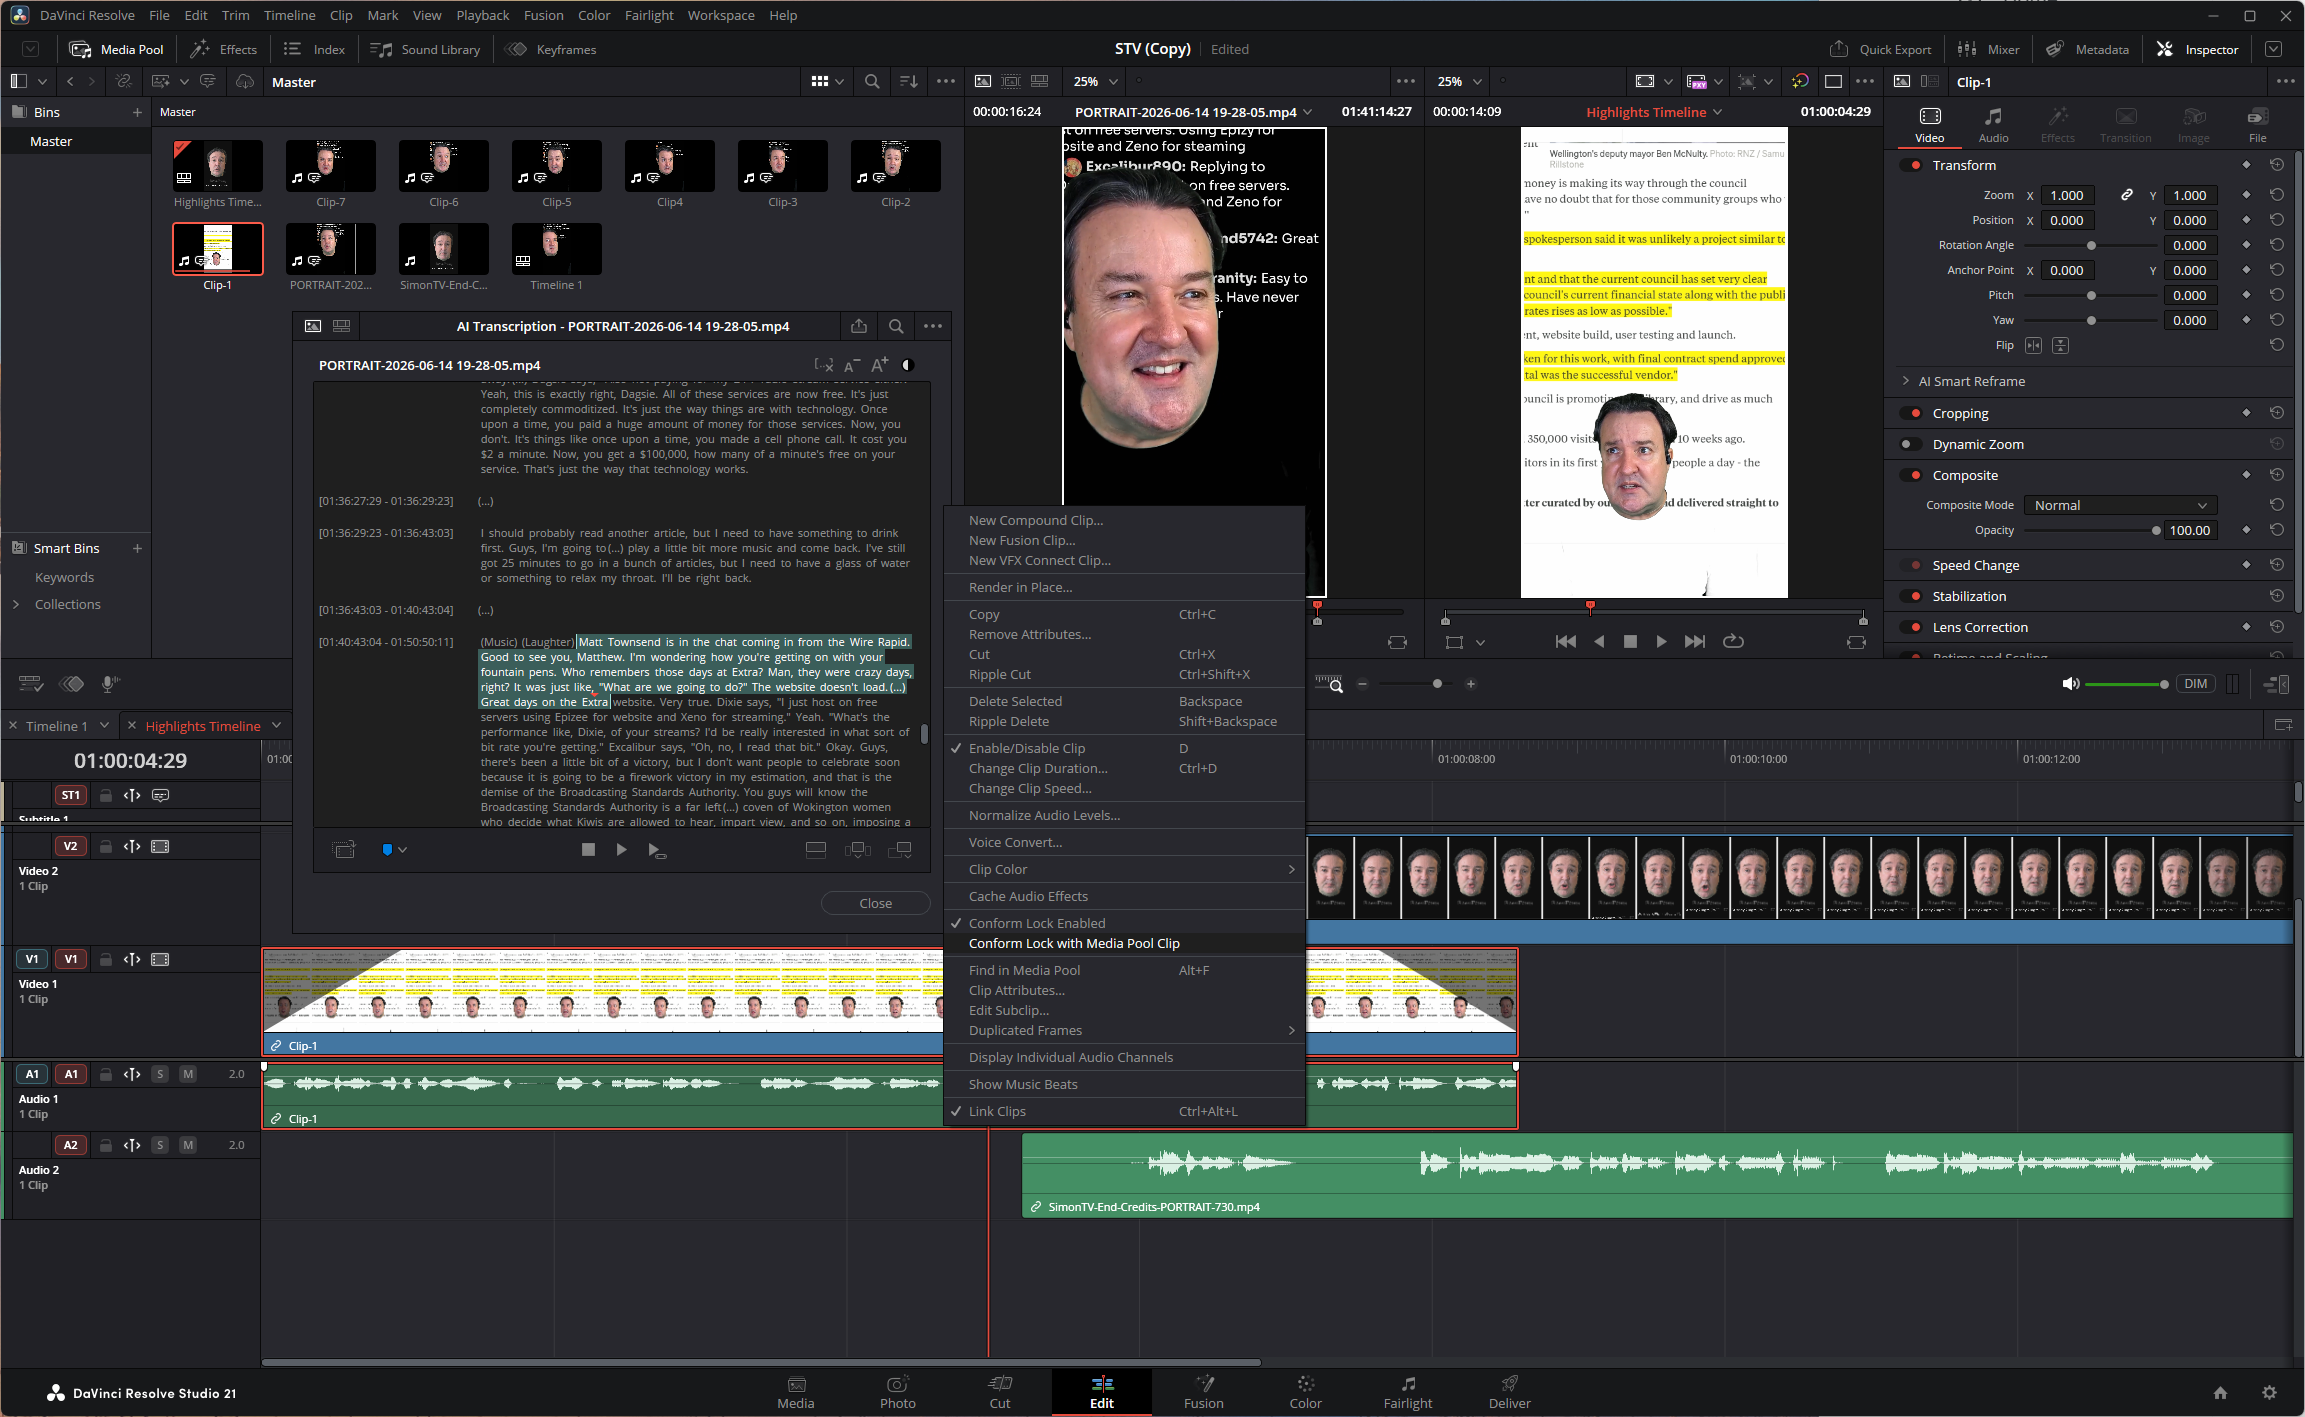
Step 1 - Transcription
Resolve has an AI feature which transcribes the entire two hour recording into text. This is not the same as the AI auto-captioning which is another useful feature I use. The transcription takes about ten minutes on my little machine to complete which is worth it for the wonderful world of Text-Based Editing it opens.
Step 2 - Text-Based Editing
This is the greatest time saver. If you’ve ever used a video editor you’ll be familiar with the standard process of scrubbing backwards and forwards to perform your edits along a timeline. With Text-Based Editing I don’t need to do this, instead of watching and listening I can read the transcript -and I read a heck of a lot quicker than I can watch.
At the bottom of the floating transcription box in the picture is a Create Subclip button. All I have to do is highlight a section of the text I think might be worthy of becoming a clip, hit that button and Resolve creates the clip for me from the corresponding segment of the recording. This is a rough cut. I read through the transcript, highlight interesting bits (typically up to a dozen) then move onto the next step having pruned most of the recording.
Step 3 - Clip Selection
I now have 10 to 12 highlight clips of 30 seconds to three minutes in length to review, from which to select the final seven. At this stage a two hour podcast has been reduced to about 25 minutes of useful footage. I watch these to choose the seven finalists.
Step 4 - Fine Cut
The seven clips are still rough cuts needing to be trimmed and edited, and otherwise modified. At this stage I might snip some uhms and ahs and a sentence here or there where I’ve digressed. This is the stage to add polish but I don’t tend to do anything too sophisticated, not even zooms for emphasis (though I probably should.) If I do need to perform anything more complicated -such as audio clean up- this is the step at which to do it.
Step 5 - Final Cut
This is the next big time saver. I’ve created a template containing the generic edits applied to all my clips: fade in, fade out, add credit sequence, position word-highlighted subtitles. This exists as a separate timeline tab in Resolve to which I can switch. I select each of the seven fine cuts I created in the previous step then right-click the dummy clip on the timeline to perform a Conform Lock with Media Pool Clip operation. This replaces the placeholder clip with the fine cut and crucially, applies the edits from the template to the fine cut clip.
Then I just need to position the sequences correctly and I’m pretty much done.
Step 6 - Normalisation and Subtitling
I haven’t worked out a method for automating the AI Subtitle and Audio Normalisation operations. I typically normalise audio at -3 to -1 dB which is a simple two-click operation.
The I run Resolve’s AI to create the subtitles which I review -the AI is very very good but it still makes the odd mistake which needs to be manually corrected. Once again, this AI subtitling is a different feature to the AI transcribing. The template already has the word highlighting and positioning of the text defined, as soon as the AI has generated the subtitles and I’ve manually corrected any mistakes it’s applied.
Step 7 - Delivery
The clip is now done. I head over to Resolve’s Delivery tab to check the preset output parameters are correct and add it to the render queue.
Step 8 - Render
Whichever video editor you’re using rendering always takes a while, fortunately it’s a process which seldom needs to be supervised. I repeat steps 4 through 7 for each of the seven clips and when I’m done, render them all as a batch job which in Resolve is a one-click operation.
SimonTV LIVE concludes at 9.30pm on Sundays. I click that Render button sometime before 11pm then go to bed. Davinci Resolve probably renders all seven clips in half an hour but I don’t pick them up until the morning, which is when I queue them for publication on the various social media sites. Job done.
Conclusion
I am not an expert, Davinci Resolve improves its capabilities rapidly and there are numerous third party AI solutions which integrate with it. Doubtless there are methods to improve my workflow and I’d particularly like to discover ways to automate the application of subtitles and audio normalisation. These would merely be icing on the cake though: my time commitment has already reduced by 80% simply by switching across from Kdenlive and utilising the capabilities I’ve discovered for myself.
-SRA. Auckland, 16/vi 2026.
A good intro summary! I will try it if there is a free layer.